UE - 네트워크 팀플 근황
UnrealEngine
멀티플레이 팀플 근황이다.
우리 팀 주제는 파티 애니멀즈

이번에도 맡은 역할은 캐릭터.
사실 이번엔 다른 파트를 담당하려고 했는데 저 래그돌 느낌의 캐릭터를 구현해보고 싶어서 지원했다.
유튜브에서 찾아본 결과 PhysicsAnimationComponent를 사용하면 애니메이션 재생도 가능하면서 래그돌 효과도 보일 수 있기에 이 방법을 선택했다. (지금와선 후회되는 선택이지만..)
1
2
3
4
5
6
7
8
9
10
11
12
13
14
15
16
17
18
19
20
21
22
23
24
25
26
27
28
29
30
31
32
33
34
35
36
ADFCharacter::ADFCharacter()
{
 	// Set this character to call Tick() every frame.  You can turn this off to improve performance if you don't need it.
	PrimaryActorTick.bCanEverTick = true;
	bUseControllerRotationYaw = false;

	SpringArm = CreateDefaultSubobject<USpringArmComponent>(TEXT("SpringArm"));
	SpringArm->bUsePawnControlRotation = false;
	SpringArm->SetupAttachment(GetRootComponent());

	Camera = CreateDefaultSubobject<UCameraComponent>(TEXT("CameraComponent"));
	Camera->SetupAttachment(SpringArm);

	PhysicalAnimComp = CreateDefaultSubobject<UPhysicalAnimationComponent>(TEXT("PhysicalAnimComp"));

	PhysicalAnimData.bIsLocalSimulation = true;
	PhysicalAnimData.OrientationStrength = 1000.0f;
	PhysicalAnimData.AngularVelocityStrength = 100.0f;
	PhysicalAnimData.PositionStrength = 1000.0f;
	PhysicalAnimData.VelocityStrength = 100.0f;
	PhysicalAnimData.MaxLinearForce = 100.0f;
	PhysicalAnimData.MaxAngularForce = 100.0f;

	LeftGrabComp = CreateDefaultSubobject<UGrabComponent>(TEXT("LeftGrab"));

	RightGrabComp = CreateDefaultSubobject<UGrabComponent>(TEXT("RightGrab"));
}

void ADFCharacter::ApplyPhysicalAnimationSettings()
{
	if (!PhysicalAnimComp || !GetMesh()) return;

	PhysicalAnimComp->SetSkeletalMeshComponent(GetMesh());
	PhysicalAnimComp->ApplyPhysicalAnimationSettingsBelow(PhysicalAnimStartBone, PhysicalAnimData, false);
	GetMesh()->SetAllBodiesBelowSimulatePhysics(PhysicalAnimStartBone, true, false);
}
애니메이션의 설정 세팅 -> 메시를 등록 -> 흐느적 거리는 효과를 어떤 본 부터 부여하는지 세팅 -> 메시 본의 물리효과 부여 순으로 진행한다.
결과
흐느적
원래는 메시의 Hips 기준으로 세팅하려고 했는데 다리가 너무 뭉개져서 Spine으로 세팅한 결과다.
이제 상반신은 피직스 효과를 받기에 힘을 줘서 물리적으로 손과 머리를 움직이게 만들었다.
1
2
3
4
5
6
7
8
9
10
11
12
13
14
15
16
17
18
19
20
21
22
23
24
25
26
27
28
29
30
31
32
33
34
35
36
37
38
39
40
41
42
43
44
45
46
47
48
49
50
51
52
53
54
55
56
57
58
59
60
61
62
63
64
65
66
67
68
69
70
71
72
73
74
75
76
77
78
UENUM(BlueprintType)
enum class EBodyPartType : uint8
{
	None,
	LeftFist,
	RightFist,
	Head,
	Body,
	LeftFoot,
	RightFoot
};

UCLASS(ClassGroup=(Custom), meta=(BlueprintSpawnableComponent))
class DFPROJECT_API ABodyPart : public AActor, public IGrabbable
{
	GENERATED_BODY()

public:
	ABodyPart();

protected:
	virtual void BeginPlay() override;
	virtual void EndPlay(const EEndPlayReason::Type EndPlayReason) override;
public:
	UFUNCTION(BlueprintCallable, NetMulticast, Reliable, Category="BodyPart")
	virtual void Attach(ACharacter* TargetCharacter, const UAttachInfoComponent* AttachInfo);

	UFUNCTION(BlueprintCallable, Category="BodyPart")
	virtual void ApplyImpulse();

	UFUNCTION(BlueprintCallable, Category="Attack")
	void PerformAttack();

	UFUNCTION(BlueprintCallable, Category="Attack")
	void SetAttackStrategy(UAbilityStrategy* NewStrategy);

	UFUNCTION(BlueprintCallable, Category="Attack")
	void SaveAttackTime();

	TObjectPtr<USphereComponent> GetBodyCollider();
protected:
	FTransform GetOffsetTransform(const ACharacter* TargetCharacter, const UAttachInfoComponent* AttachInfo);

	UFUNCTION()
	void OnAttackOverlap(
		UPrimitiveComponent* OverlappedComp,
		AActor* OtherActor,
		UPrimitiveComponent* OtherComp,
		int32 OtherBodyIndex,
		bool bFromSweep,
		const FHitResult& SweepResult
	);

	UPROPERTY(EditAnywhere)
	float ImpulsePower = 10000.0f;

	UPROPERTY(EditDefaultsOnly, BlueprintReadWrite, Category="Collider")
	TObjectPtr<USphereComponent> BodyCollider;

	UPROPERTY(VisibleAnywhere)
	TObjectPtr<UPhysicsConstraintComponent> BoneConstraint;

	FName BoneToAttach;

	UPROPERTY(EditAnywhere, Category="Collider")
	float VirtualMass = 5.0f;

	UPROPERTY(EditAnywhere, Category="Attack")
	UAbilityStrategy* CurrentAttackStrategy;

	float LastAttackTime = -1.f;

	UPROPERTY(EditDefaultsOnly)
	float AttackValidDuration = 0.5f;

	UPROPERTY()
	TObjectPtr<ACharacter> OwningCharacter;
};
ABodyPart 클래스는 메시의 본과 연결되어 Impulse를 받으면 메시의 본이 따라 끌려가도록 구현했다.
연결 방식은 UPhysicsConstraintComponent를 이용해 부착하는 방식이다.
1
2
3
4
5
6
7
8
9
10
11
12
13
14
15
16
17
18
19
20
21
22
23
24
25
26
27
28
29

void ABodyPart::Attach_Implementation(ACharacter* TargetCharacter, const UAttachInfoComponent* AttachInfo)
{
	if (!TargetCharacter) return;

	SetOwner(TargetCharacter);
	OwningCharacter = TargetCharacter; // 그냥 Owner로 할까 고민

	USkeletalMeshComponent* Mesh = TargetCharacter->GetMesh();

	// AttachInfo 정보로 부착 및 위치, 회전, 크기 설정.
	BoneToAttach = AttachInfo->TargetBoneName;

	// 본에 상대적으로 부착
	BodyCollider->AttachToComponent(Mesh, FAttachmentTransformRules::KeepRelativeTransform, BoneToAttach);

	// 본 위치에서 오프셋 적용
	BodyCollider->SetRelativeTransform(GetOffsetTransform(TargetCharacter, AttachInfo));

	// Constraint로 연결하기 전 물리속성 설정 (생성자에서 하면 원하는 중력 때문에 아래로 떨어진 뒤 연결됨)
	BodyCollider->SetSimulatePhysics(true);
	BodyCollider->SetCollisionEnabled(ECollisionEnabled::QueryAndPhysics);
	BodyCollider->SetCollisionObjectType(ECC_PhysicsBody);
	BodyCollider->SetMassOverrideInKg(NAME_None, 5.f, true);

	// BodyCollider와 메시를 연결
	BoneConstraint->AttachToComponent(Mesh, FAttachmentTransformRules::SnapToTargetNotIncludingScale, BoneToAttach);
	BoneConstraint->SetConstrainedComponents(BodyCollider, NAME_None, Mesh, BoneToAttach);
}
본의 위치에 딱 맞게 부착시키면 생각보다 원하는 위치에 붙지 않았다.
때문에 오프셋을 주어야하는데, 값을 바꾸고 빌드하고 에디터에서 플레이해서 확인하기에는 번거롭기에 바디 파츠의 위치를 뷰포트에서 설정할 수 있도록 도와줄 AttachInfoComponent 를 만들었다.
1
2
3
4
5
6
7
8
9
10
11
12
13
14
15
16
17
18
19
20
21
22
23
24
25
UCLASS( ClassGroup=(Custom), meta=(BlueprintSpawnableComponent) )
class DFPROJECT_API UAttachInfoComponent : public USceneComponent
{
	GENERATED_BODY()

public:
	UAttachInfoComponent();

	// 오프셋은 타겟 본 위치와 이 컴포넌트의 위치의 차이로 구함.

	UPROPERTY(EditAnywhere, BlueprintReadWrite, Category = "Attach Info")
	FName TargetBoneName;

	UPROPERTY(EditAnywhere, BlueprintReadWrite, Category = "Attach Info")
	TSubclassOf<ABodyPart> BodyPartClass;

	UPROPERTY(EditAnywhere, BlueprintReadWrite, Category = "Attach Info")
	EBodyPartType BodyPartType;

	UPROPERTY(EditAnywhere, BlueprintReadWrite, Category = "Attach Info")
	bool bAutoSpawnBeginPlay = true;

	UPROPERTY(EditAnywhere, Category="Attach Info")
	TObjectPtr<USphereComponent> PreviewCollider;
};
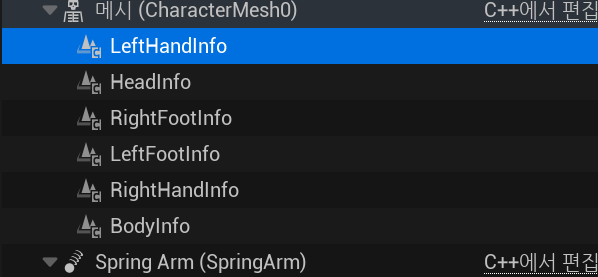
내용물은 간단하게 생성할 바디 타입, 미리보기용 콜라이더, 붙일 본의 이름, 시작시 바로 생성 옵션 등등 이 있다.
콜라이더 종류도 고를 수 있도록 PrimitiveComponent로 설정하려고 했는데 CreateDefaultSubobject로 생성이 되지 않아서 일단 Sphere로 설정했다.
뷰포트에서 보면 이렇다.
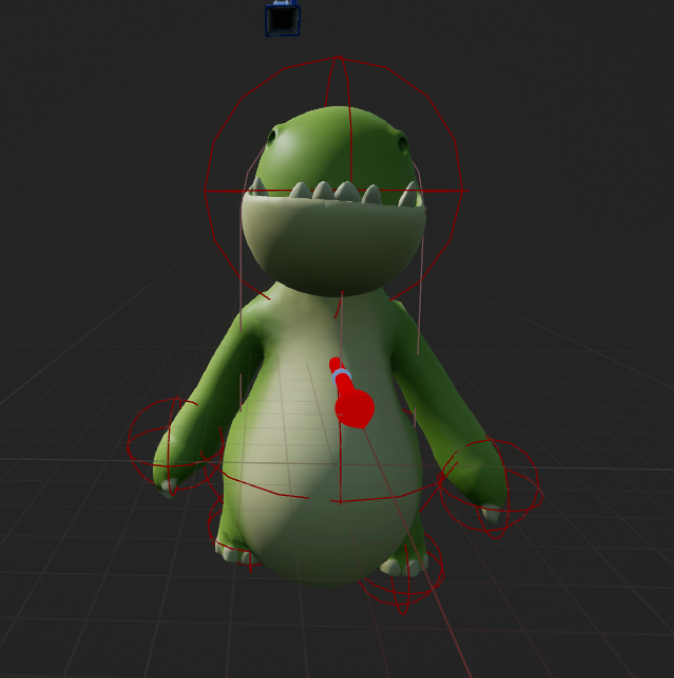
저기 빨간 콜라이더가 생성될 바디파츠의 프리뷰.
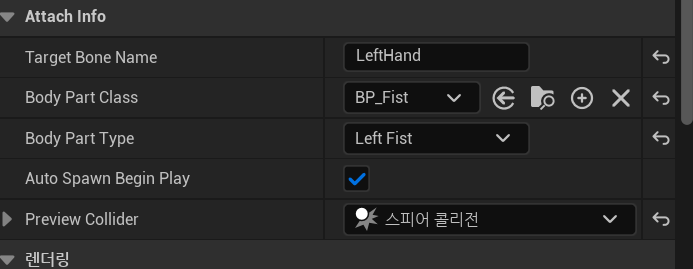
설정값도 이렇게 세팅해준다.
실제로 생성한 모습이다.
생성한 바디 파츠들은 map에 담겨지고, 이 map은 Enum을 사용해 원하는 바디파츠를 가져온다.
1
2
3
4
5
6
7
8
9
10
11
12
13
14
void ADFCharacter::Server_Punch_Implementation()
{
	if (bIsStunned) return;
	if (!BodyParts.Contains(EBodyPartType::LeftFist) || !BodyParts.Contains(EBodyPartType::RightFist)) return;

	ABodyPart* Fist = bLeft ? BodyParts[EBodyPartType::LeftFist] : BodyParts[EBodyPartType::RightFist];
	if (!Fist) return;
	UAbilityStrategy* PunchStrategy = NewObject<UPunchAbilityStrategy>(this); // this = Outer

	Fist->SetAttackStrategy(PunchStrategy);
	Fist->PerformAttack();

	bLeft = !bLeft;
}
왼손, 오른손을 가져와 펀치하는 코드.
위 코드를 보면 알 수 있듯이 전략 패턴을 사용한 어빌리티를 구현했다.
1
2
3
4
5
6
7
8
9
10
11
12
13
14
15
16
17
18
19
20
21
22
23
24
25
// Fill out your copyright notice in the Description page of Project Settings.

#pragma once

#include "CoreMinimal.h"
#include "AbilityStrategy.generated.h"

class ABodyPart;
/**
 *
 */
UCLASS(Abstract, Blueprintable)
class DFPROJECT_API UAbilityStrategy : public UObject
{
	GENERATED_BODY()
public:
	UFUNCTION(BlueprintNativeEvent)
	void StartAbility(ABodyPart* BodyPart);

	UFUNCTION(BlueprintNativeEvent)
	void StopAbility(ABodyPart* BodyPart);

	UFUNCTION(BlueprintNativeEvent)
	bool IsAbilityActive() const;
};
결과
아직 매니저도 없고 BodyPart에만 집중해 설계해서 수정할 부분들이 많지만 문제 없이 작동한다.
바디파츠 외에도 사용 가능한 UAbilityStrategyBase 와 관리하는 매니저 컴포넌트를 추가할 예정이다.
또한 컨디션 이라는 개념을 넣어 어빌리티를 실행할 때 필요한 조건을 검사할 예정이다.
가장 힘든 부분이 잡기다.
잡기는 지금 크게 GrabComponent, Grabbable, GrabHandle 3가지로 구성된 시스템이다.
시스템의 흐름은
- 잡기 시스템 시작
- 영역 내의 잡을 수 있는 액터(
Grabbable을 상속받은 액터) 중 가장 가까운 액터 찾아TargetActor로 설정 - 핸들러가
TargetActor에 대해 세부 로직 처리 - 핸들러가
TargetActor를 잡으면GrabComponent에게 알려줌
1
2
3
4
5
6
7
8
9
10
11
12
13
14
15
16
17
18
19
20
21
22
23
24
25
26
27
28
29
30
31
32
33
34
35
36
37
UENUM(BlueprintType)
enum class EGrabState : uint8
{
	Idle,
	Detecting,
	MovingToGrab,
	Grabbing,
};


UCLASS( ClassGroup=(Custom), meta=(BlueprintSpawnableComponent) )
class DFPROJECT_API UGrabComponent : public UActorComponent
{
	GENERATED_BODY()

public:
	UGrabComponent();

	virtual void BeginPlay() override;

	virtual void TickComponent(float DeltaTime, enum ELevelTick TickType, FActorComponentTickFunction* ThisTickFunction) override;

	void StartGrab(); // 소유자가 잡기를 시작할 때 호출

	void StopGrab(); // 잡기 감지 취소

	UFUNCTION(BlueprintCallable, Category = "GrabEvents") // 대상이 잡힐 때 호출됨.
	void Grabbed(const FGrabTargetInfo& Info);

	UFUNCTION(BlueprintCallable, Category = "GrabEvents") // 대상을 놓을 때 호출해야함.
	void Released();

	void SetGrabHandler(TObjectPtr<UGrabHandler> InGrabHandler);

protected:
	void DetectClosestGrabbable();
};
내용물이 너무 많아 중요한 것들만 올려본다.
GrabComponent는 대기, 감지, 이동, 잡음 상태가 존재한다.
1
2
3
4
5
6
7
8
9
10
11
12
13
14
15
16
17
18
19
20
21
22
23
24
25
26
27
28
void UGrabComponent::TickComponent(float DeltaTime, enum ELevelTick TickType,
	FActorComponentTickFunction* ThisTickFunction)
{
	Super::TickComponent(DeltaTime, TickType, ThisTickFunction);

	switch (CurrentState)
	{
	case EGrabState::Idle:
		break;

	case EGrabState::Detecting:
		UE_LOG(LogTemp, Warning, TEXT("Grab Component is Detecting closest grabbable."));
		DetectClosestGrabbable();
		if (CurrentTarget && GrabHandler)
		{
			GrabHandler->MoveToTarget(CurrentTargetLocation); // 이동 상태로 진행
			// 타겟이 잡히면 Grabbing 상태로 전환
			//SetGrabState(EGrabState::Grabbing);
		}
		break;

	case EGrabState::Grabbing:
		break;

	default:
		break;
	}
}
매 틱마다 상태에 맞는 동작을 진행한다.
지금 작성하면서 보니 차라리 idle 상태를 없애고 tick을 키고 끌 수 있도록 만드는 것도 괜찮을 것 같다.
1
2
3
4
5
6
7
8
9
10
11
12
13
14
15
16
17
18
19
20
21
22
23
24
25
26
27
28
29
30
31
32
33
34
35
36
37
38
39
40
41
42
43
44
45
46
47
48
49
50
51
52
53
54
55
56
57
58
59
60
61
62
63
64
65
void UGrabComponent::DetectClosestGrabbable()
{
	TArray<FHitResult> Hits;
	FVector Start = ComputeDetectionStart();
	FVector End = ComputeDetectionEnd();

	FCollisionShape Shape = FCollisionShape::MakeSphere(DetectionRadius);
	FCollisionQueryParams Params;
	Params.AddIgnoredActor(GetOwner());

	GetWorld()->SweepMultiByChannel( // Start부터 끝까지 Sweep으로 충돌 검사
		Hits,
		Start,
		End,
		FQuat::Identity,
		ECC_Visibility,
		Shape,
		Params
	);

	AActor* ClosestActor = nullptr;
	float ClosestDistanceSq = FLT_MAX;

	for (const FHitResult& Hit : Hits)
	{
		AActor* HitActor = Hit.GetActor();
		if (!HitActor || !IsValidGrabTarget(HitActor)) continue; //잡을 수 있는 액터 찾기

		AActor* OwnerActor = GetOwner();
		if (HitActor == OwnerActor || HitActor->GetOwner() == OwnerActor || OwnerActor->GetOwner() == HitActor)
		{
			continue;
		}

		float DistSq = FVector::DistSquared(Hit.ImpactPoint, GetOwner()->GetActorLocation()); // 액터 위치와의 거리
		if (DistSq < ClosestDistanceSq) // 가장 가까운 액터 찾기
		{
			ClosestDistanceSq = DistSq;
			ClosestActor = HitActor;
			CurrentTargetLocation = Hit.ImpactPoint;
		}
	}

	CurrentTarget = ClosestActor; // 가장 가까운 액터를 현재 타겟으로 설정


#if WITH_EDITOR // 디버그용. 구로 Sweep 하면 캡슐이니 캡슐로 표시함.
	FVector SweepCenter = (Start + End) * 0.5f;
	FVector CapsuleDirection = End - Start;
	float HalfHeight = CapsuleDirection.Size() * 0.5f;
	FQuat CapsuleRotation = FRotationMatrix::MakeFromZ(CapsuleDirection).ToQuat();

	DrawDebugCapsule(
		GetWorld(),
		SweepCenter,
		HalfHeight,
		DetectionRadius,
		CapsuleRotation,
		FColor::Green,
		false,
		0.1f
	);
	DrawDebugSphere(GetWorld(), CurrentTargetLocation, DetectionRadius, 12, FColor::Red, false, 0.1f);
#endif
}
여기가 잡을 수 있는 액터를 감지하는 함수다.
지금은 SweepMultiByChannel로 감지한다. 이것도 나중에 감지 타입으로 분리할 수 있을 것 같다.
감지 흐름
Sweep으로 충돌한 액터들을 가져오기- 잡기 가능한지,
Owner인지,Owner가 같은지 검사 - 거리 비교 후 가장 가까우면
TargetActor
gpt한테 디버그용 코드를 추가해달라 부탁했는데 생각보다 잘해줘서 놀랐다.
GrabHandler
1
2
3
4
5
6
7
8
9
10
11
12
13
14
15
16
17
18
19
20
21
22
23
24
25
26
27
28
29
30
31
32
33
34
35
36
37
38
39
40
41
42
43
44
45
46
47
48
49
50
51
52
53
54
55
56
57
58
59
60
61
62
63
64
65
66
67
68
69
70
71
72
73
74
75
76
77
#pragma once

#include "CoreMinimal.h"
#include "GrabHandler.generated.h"

class UGrabComponent;

USTRUCT(BlueprintType)
struct FGrabTargetInfo
{
	GENERATED_BODY()

	UPROPERTY()
	AActor* TargetActor = nullptr;

	UPROPERTY()
	UPrimitiveComponent* TargetComponent = nullptr;

	UPROPERTY()
	FVector HitLocation = FVector::ZeroVector;

	UPROPERTY()
	FVector HitNormal = FVector::ZeroVector;

	UPROPERTY()
	FName SocketName = NAME_None;
};

DECLARE_DYNAMIC_MULTICAST_DELEGATE_OneParam(FOnGrabStart, const FGrabTargetInfo&, TargetInfo);
DECLARE_DYNAMIC_MULTICAST_DELEGATE(FOnGrabRelease);
DECLARE_DYNAMIC_MULTICAST_DELEGATE_OneParam(FOnGrabFailed, const FGrabTargetInfo&, TargetInfo);

/**
 * GrabComponent가 필터링과 감지, 흐름을 관리한다면
 * 여긴 감지한 대상을 어떻게 잡을 지, 잡고 난 후의 처리를 담당
 */
UCLASS(Blueprintable)
class UGrabHandler : public UObject
{
	GENERATED_BODY()
public:
	void SetOwningGrabComponent(UGrabComponent* GrabComp);
	bool IsGrabbable(const AActor* Target);

	UFUNCTION(BlueprintCallable, Category = "Grab")
	virtual void MoveToTarget(const FVector& Location) {}

	UFUNCTION(BlueprintCallable, Category = "Grab")
	virtual void ExecuteGrab(const FGrabTargetInfo& TargetInfo);

	UFUNCTION(BlueprintCallable, Category = "Grab")
	virtual void ReleaseGrab();


	UPROPERTY(BlueprintAssignable, Category = "GrabEvents")
	FOnGrabStart OnGrabStart;

	UPROPERTY(BlueprintAssignable, Category = "GrabEvents")
	FOnGrabRelease OnGrabRelease;

	UPROPERTY(BlueprintAssignable, Category = "GrabEvents")
	FOnGrabFailed OnGrabFailed;

protected:
	UFUNCTION()
	void OnGrabColliderBeginOverlap(
		UPrimitiveComponent* OverlappedComponent,
		AActor* OtherActor,
		UPrimitiveComponent* OtherComp,
		int32 OtherBodyIndex,
		bool bFromSweep,
		const FHitResult& SweepResult
		);

	UPROPERTY()
	UGrabComponent* OwningGrabComponent;
};
Handler가 실제로 잡기를 어떻게 처리할건지 담당한다.
이렇게 Handler로 나눠놔서 GrabComponent에 Handler만 교체하면 다른 잡기 기능도 구현할 수 있다.
MoveToTarget으로 대상에게 이동하는 로직을 구현 ExecuteGrab으로 잡기 구현 ReleaseGrab으로 놓기 구현하면 된다.
이벤트용 델리게이트도 만들어뒀다.
1
2
3
4
5
6
7
8
9
10
11
12
13
14
15
16
17
18
19
20
21
22
23
24
25
26
27
28
29
30
31
32
33
34
35
36
// Fill out your copyright notice in the Description page of Project Settings.

#pragma once

#include "CoreMinimal.h"
#include "Grabbable.generated.h"

UENUM(BlueprintType)
enum class EGrabMode : uint8
{
	LooseAttach      UMETA(DisplayName = "Loose Attach"),      // 단순히 잡기만
	AttachOnly       UMETA(DisplayName = "Attach Only"),       // 소켓에 붙지만 활성화 없음
	AttachAndEnable  UMETA(DisplayName = "Attach and Enable")  // 소켓에 붙고, 기능 활성화
};

UINTERFACE(MinimalAPI, Blueprintable)
class UGrabbable : public UInterface
{
	GENERATED_BODY()
};

class DFPROJECT_API IGrabbable
{
	GENERATED_BODY()

public:

	UFUNCTION(BlueprintNativeEvent, BlueprintCallable, Category = "Grab")
	TArray<FName> GetPreferredGrabSocketNames() const;

	UFUNCTION(BlueprintNativeEvent, BlueprintCallable, Category = "Grab")
	EGrabMode GetGrabMode() const;

	UFUNCTION(BlueprintNativeEvent, BlueprintCallable, Category = "Grab")
	void OnGrabbedBy(AActor* Grabber);
};
Grabbable은 잡기을 수 있는 액터를 분간하고 지원하기 위해 만들었다.
GrabComponent의 Detect도 Grabbable을 상속하고 있는지 확인하기에 잡을 수 있으려면 꼭 이걸 상속받아야한다.
현재까지의 결과
결과
결과
결과
결과
문제점. 지금 움직임이 CharacterMovement의 AddMovmentInput을 사용한다.
이게 왜 문제냐면 이동 방식이 AddForce처럼 힘을 줘서 밀리는 방식이 아닌 순간이동 방식이라 문제다.
잡기에서 두 물체를 연결하는 방식은 PhysicsConstraint를 사용해 제약을 두는 방식이다.
하지만 이 PhysicsConstraint는 AddMovmentInput 방식에 어울리지 않는다.
때문에 캐릭터가 래그돌 상태의 캐릭터를 잡는 것이 아니라면 잡기가 제대로 작동하지 않는다.
또한 캐릭터를 상속받은 것도 문제가 있다.
갱비스트, 휴먼폴플랫, 파티애니멀즈 같은 액티브 래그돌 방식의 캐릭터는 보통 ACharacter가 아닌 AActor로 만들어야 완전히 물리적인 시스템을 구축하기 쉽다.
지금 나는 ACharacter를 상속받아서 캐릭터에게 Force나 Impulse를 줄 수 없기에 잡고 끌기가 불가능하다.
그렇다고 캐릭터를 새로 만들자니 AI의 Move to 기능이 CharacterMovement Component가 있어야지 동작한다는 사실을 알게 되었고,
CharacterMovmentComp가 멀티 지원도 많이 해주기에 그대로 진행하기로 결정했다.
때문에 캐릭터가 끌려가는 듯하게 속이는 방식을 구상 중이다.
이건 아직 구현하지 못했기에 패스.
요즘 3~4 시간 자는게 일상이라 너무 피곤하다.
눈속임 시스템, 아이템 사용, 멀티플레이 지원 등등… 너무 할 것도 많고 일주일안에 이걸 다 할 수 있을지 모르겠다..